Thursday, March 31, 2011

My Cricut Station

I'm constantly updating and moving things around in my studio but one thing I'm pretty happy with is my Cricut Station. The challenge this month on the Circle Magazine was to show our storage so I thought I'd share my cricut work space. I hope it will inspire you in your organizing adventure.

This is the bulk of my cricut station. I don't keep my carts in the boxes as you'll see in a pic further down but I do like to keep my newest ones next to my machine until I use them. It helps keep me from being a collector instead of a scrapbooker. ;o)


I'll start below with my cuttlebug area. All of the shelving is jet max cubes from Michaels.  This one holds my cuttlebug and my folders are in the drawer next to it. Makes it very handy!

 I have a video you can check out <> where I show how I cut the packaging down for dividers. I sort them alphabetically and my plates are stored to the front of the drawer. I used to have them in a crate on top of my shelves which you can see in the video and that worked great but now that I have more this little shelf with drawer makes it handy and attractive while saving my counter top for other things.


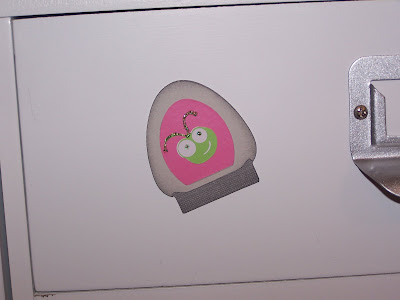
The new Cricut Everyday cart had this adorable bug and lettering that I cut out of vinyl to put on the drawer. Too cute!!
 To the right of this is where I store my cartridges, handbooks, and overlays. I made little folder pockets to hold the handbook and overlay. Next to them on the size I store the actual cartridge. The pink bag to the back holds my cricut markers and extra blades. I still need to get my label maker out and label all of them and the drawer fronts. Organizing is never finished it seems.
 Again I used the Cricut Everyday cart to cut these cute little cartridges out to decorate the front on the drawers. I added stickles to the antennas. Gotta have my bling!!

 On the end of my cabines I have one of the little plastic hooks you can buy from Wal-Mart or other store. It holds all of my mats for the Expression. It works perfect! My mats are always within easy reach.
Last but not least by any means is my Pink E. It sits center stage and gets used almost daily. I pull it to the front of the cabinet and it has plenty of room for the mat to clear. I love my studio and my lil cricut station. I hope it's given you ideas for your own space whether it be big or small. My next organizing feat is to set up my new Imagine Station! I just got it but I know I want to get it all organized as well so I can begin to use it daily as well!

Have a great day and as always I love to hear your feedback. 
Hugz
tina


Wednesday, March 30, 2011

Gift Card Set

I've been working on these cards for a while and I showed a couple a while back. I worked on them some more at the Stampede and finally finished several gift sets. I made them all out of my scrap drawers and the Create a Critter Cart.

I made a gift box for them to fit in. There's a pocket to the back to hold the envelopes. I'll tie a nice pretty bow around it and it'll be ready to give to someone special.

 The cards are 3x3, a perfect size for a those last minute little gifts. I thought everyone would love to receive something like this. At least I know I would. LOL Totally useful for everyone!

I cute all the animals at 2 inches, inked and blinged them up as always. I hope you enjoy and let me know what you think. I'm entering these in the Just Because Weekly Challenge on the Circle Blog.

Wednesday, March 9, 2011

Scrappin With my Bug

It seems like I've been working on this forever. I kept changing and adding things. I think I'm pretty happy with it other than I think it needs some more bling. lol
This will be going on my table in Dallas and then hanging on my wall when I get back. I think it turned out too fun!


Now for a little detail about what I used to create it. Scrappin With my Bug came from the new Everyday Cricut cart exclusive to Circle members. It has soo many cute phrases it was hard to decide on one. The frame is from Lacy Labels. I definitely see places for a little bling here!


I made Cowboy Cricut with two carts. The body and clothes are from Paper Doll Dress Up and the head is from Everyday Cricut. I chose the cowboy get up in honor of the Stampede but he'll be right at home in my studio afterwards.


I'm not so sure she turned out looking like me but she is cute! She's from Paper Doll Dress Up as well as her camera. I used Diva Liquid Pearls for her buttons on her shirt, pink pearls for her earrings and some diamond bling for her ring.

And my favorite part of her accessories!! She has her own Cricut Circle charm bracelet! Isn't that fabulous?!  I had to hand cut it because it was soo tiny! I used some diamond glaze on it to stiffen it up then attached it to a beaded bracelet I strung together.


The last little detail is my pink cricut from Everyday Cricut again. Even though I cut it bigger the buttons were just too small so I ended up drawing them in with a marker. I'm not sure how big you would have to cut it to get them big enough to cut out so be warned if you decide to try this cut.

I hand cut the table as well. I even made it the colors of my table in my studio. It's perfect! I had another table cut from the French Manor cart but I just couldn't get the proportions to work with everything else. I'm so glad because this complements my room and the layout so much better.

Shutterbuggin, my messageboard name and Tina were cut with Pooh Font and the capital letters are from the cricut font on Everyday Cricut.

I think that about covers it. If I missed anything let me know and I'll be happy to answer. Be sure to let me know what you think and if you're coming to Dallas.

Hugz
Tina

Thursday, March 3, 2011

Bibbidy Bobbidi Boo

Every little girls dream and big girls too is to have a fairy godmother make all her dreams come true. At Walt Disney World they gave my daughter just that chance at the Bibbidy bobbidy Boutique. She was assigned her own fairy godmother in training to do her hair and make up, transforming her into a real fairy tale princess. Well in her case she opted to be a pirate princess with a skull crown.
These are pictures from our 2007 trip that I've been waiting to do and the Cricut Circle Challenge was just the push I needed. The challenge was to include a fairy tale figure and who better than the Fairy Godmother herself from Cinderella.


A little about the details of the pages and the cartridges I used.


Fairy Godmother and the crown are from Happily Ever After.  The clock, shoe, and castle border are from Wall Decor and More.


 The title is cut from Wild Card. I love this font!! I will definitely be using it a lot. I happened upon it when I was beta testing the new Cricut CraftRoom. I have the cart and didn't even know about this font. Silly me.

Speaking of the Cricut CraftRoom I am so excited for it's release. I've been playing some with it and it's fabulous!! I can't wait for all the glitches to be worked out and available to cut with. It's the bomb!!

Hope you enjoyed my layout of my princess.
Have a blessed day
Tina