Thursday, October 21, 2010

Baby Album Continues

I've finally got going on my son's long overdue baby album again. I swore I would have it done by the end of summer but didn't make it. Then I said by his 20th birthday which was Oct 4. Hump, I'm determined to finish it before the end of the year though! LOL Seriously!!


This is month 6 and his Easter pics. I used some embellishments I had in my stash such as the ribbon title, rub on, and the duck stickers.

This page I used A Child's Year to cut out the toy ball and stars. I inked everything and added some pearl bling for dimension.
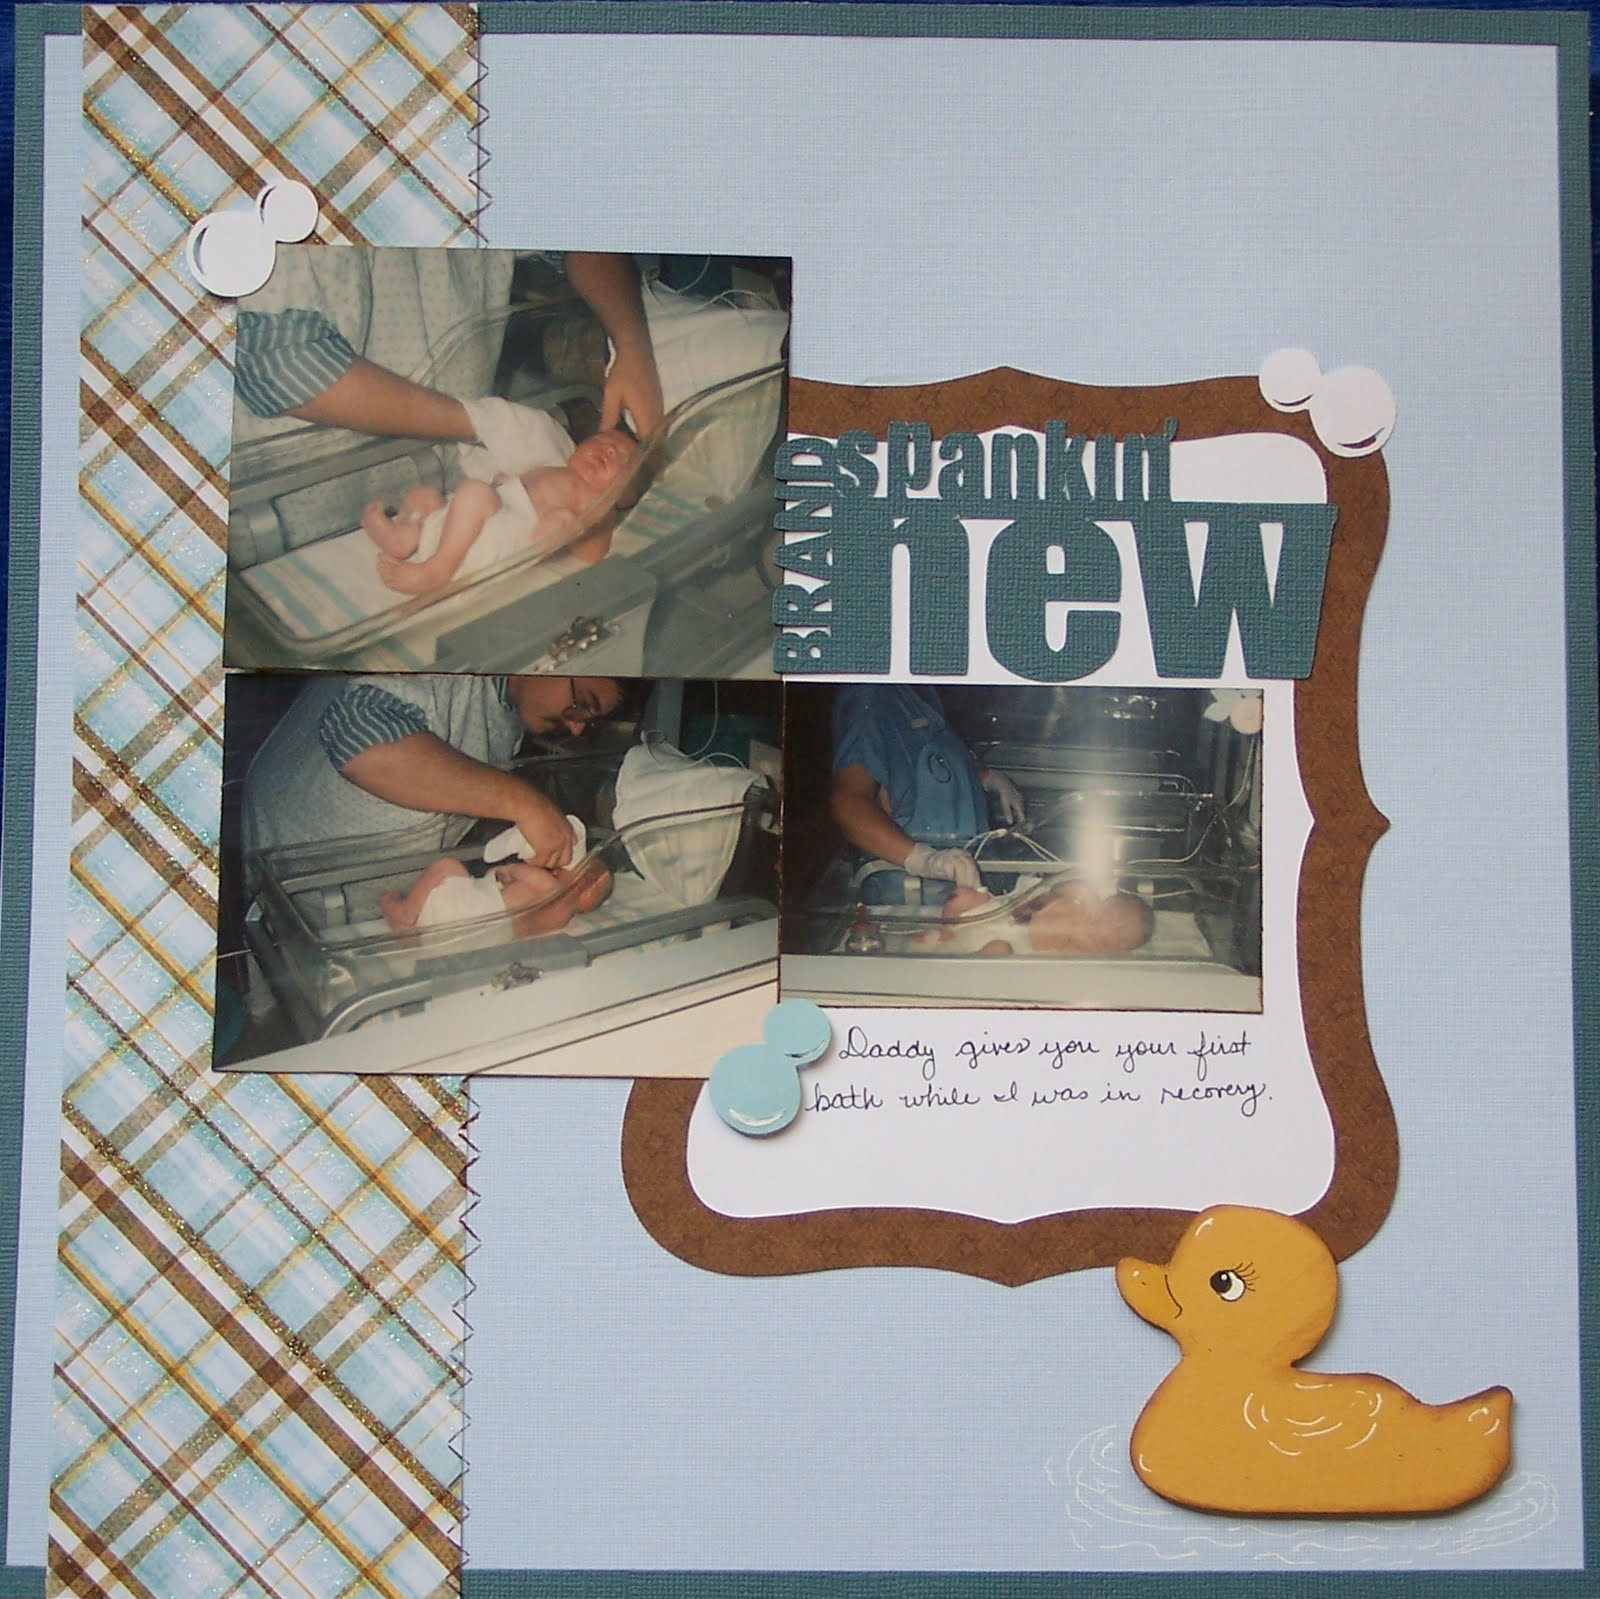
Sorry about the photos. I used my daughters camera because I wanted to get them posted. It usually does a fair job but the pictures look a little grainy and miscolored this time.

I hope you enjoy following me on my journey and quest to finish this album. I'd love to hear your comments or even just a note of encouragement to keep going. LOL
Hugz
Tina

Tuesday, October 5, 2010

Wicked Tilda

I made very special cards for my kids birthday cards this year. They have been wanting to see the Broadway Show Wicked and we surprised them with tickets! I couldn't resist using my Tilda's as Glenda and Elphaba.
I used Spellcaster Tilda as Glenda for the front of my card. I colored her with my copics and blinged her up with a glitter pen and rhinestones. The edge was punched with an EK Success border punch that I received from one of my awesome swap friends.

Here's a close up of Miss Glenda the Good Witch.

 On the inside I used Witch Tilda as Elphaba the Wicked Witch of the West. I used a papertrey ink stamp for the sentiment using versamark and then used green embossing powder.  The Wicked was cut with my cricut and Storybook.
And here's a close up of Elphaba. I was a little afraid to try and make her flesh green but I think it turned out fabulous! I hope you enjoy my little spurt of creativity with my Tilda's. My kids were definitely surprised and we're all excited to see the play next month.

I'm entering this in the Just Magnolia challenge which is Anything Goes.
Hugs
Tina

Wednesday, September 22, 2010

French Manor Bonjour Canvas

I'm really enjoying French Manor, the first cricut circle cart that was released. My daughter is redoing her room in a Paris motif so this cart is perfect for the projects we have planned for her room. I thought I'd share an altered canvas we did recently.
We started with a 12x12 prepped canvas and covered it with some scrapbook paper and modge podge. All of the cuts are from the French Manor cart and we blinged it up with pearls, rhinestones and my newest tool the I-Rock.
 And let me tell you it ROCKS!! I love it. The jewels will not budge once they're set. It will set of fabric, paper, etc. I have been told any heat set jewels will work with it but I've only used the I-Rock jewels so far.


Some of the cuts I just wrapped out the canvas for added dimension.
I hope you enjoyed our little project for today and if you did please leave a comment. I'll be posting more pics of my daughters room and things we create soon.
Hugz
Tina

Monday, September 13, 2010

Join me in the Cricut Circle

The circle is opening again for a limited time but by referral only. I would love to have you join us. If you have ever given any thought to joining the Cricut Circle NOW is the time. After September 13th the circle enrollment will be closed again.

I have been so pleased with the Cricut Circle 


I won a Cricut Expression for my church's school. That alone made it worth every penny for me. There are many events planned for members in local areas including swarms, meet and greets, and just plain old fun. Several were fortunate enough to attend CHA and receive various prizes, one being the IMAGINE. There are definitely great perks available!

Check here for more details. The yearly membership is definitely the way to go. For $274.99 you receive all I mentioned above. An exclusive cartridge quarterly. These are full sized cartridges not available anywhere else. The first is French Manor which is awesome. They've give us a sneak peak of an image for the next one but I can't share. You'll have to join to see. A great message board, with fun activities going on all of the time. Including contests and giveaways!  You will receive Cricut Reward points for the membership fee price. You earn double points for all your cricut.com purchases plus you receive 10% off those same purchases. It's a win win.


If you'd like to join remember it's only open until Sept 13th and by referral only. Leave me a note or email me for an invite. I'd love to have you in the circle with me.

Friday, September 3, 2010

4 & 5 Months; Baby Album

I did single layouts for months 4 & 5. I must have been busy chasing him and not enough time to snap photos. LOL  

The 4 and star negative are more chipboard pieces as well as the bracket. I used rubons for the pride & Joy and 5 months.

Cricut cuts from:
Graphically Speaking - rolodex card for journaling.

Tuesday, August 31, 2010

3 Months; Baby Album

I have used lots of sketches to make this album go together quickly as well. I keep a binder full of sketches to refer to when I need a little inspiration. I sorted all my photos and pick the ones I want to use then look through my sketches then it's just a matter of picking papers. Since I'm using a line from My Minds Eye the work of matching papers is done for me. I just pull out two or three for the layout I'm working on and wam bam it's done! Great way to get caught up quickly.

I used a couple more of the metal charms and ribbon to tie these pages together.

Cricut cuts from:
Plantin Schoolbook - Scalloped Border
Graphically Speaking - Buttons, 3 and circle border

Sunday, August 29, 2010

Month 2; Baby Album

This set of pages I had a hard time keeping with my paper theme since it was Baby's 1st Christmas. Everything in me wanted to break away and pull out Christmas papers but I'm glad I didn't. I used another journaling stamp from Michael's $1 spot. The star is the negative chipboard from the star on the first page and the two is a chipboard piece from my stash as well. Everything is else is my cricut. I love my cricut. It has made this album such a cinch to pull together and such fun! I added a lil metal rocking horse charm and some ABC block buttons to the layouts along with more ribbon.


Cricut cuts from:
Pooh Font - Baby's 1st Christmas
Graphically Speaking - notepad journaling and circle behind the two

Friday, August 27, 2010

1 Month; Baby Album Continues

I'm thoroughly enjoying looking through all the old baby photos. I just don't know where the time has gone.

Baby Boy is buttons from Hobby Lobby.
The pearl accents is from Viva Decor Pearl Pen. This is the first time I've used them and I'm really liking this new product. The look just like pearl accents but a lot more economical and they stay put.


Cricut cuts from:
Graphically Speaking - 01, circle border, Shhh, and Notepad

Wednesday, August 25, 2010

The next set of pages is bringing baby home and meeting family.

The journaling stamp is from the $1 stamps at Michaels. I decided to hand journal the entire album. I don't like my handwriting but I wanted it there for my son in years to come. The family stamp is from Technique Tuesday. I love all the pieces of this stamp set and how you can build different looks with it.

Cricut cuts from:
Cindy Loo -Tree
A Child's Year - Girl pushing Buggy

Tuesday, August 24, 2010

Baby's 1st Year Album

My goal this summer was to put together my son's 1st year album. Of course he turns 20 in another month so I don't think I started a minute too soon. LOL I have 24 years of photos to scrap and I mostly work on current photos while the memory is fresh and I can do more meaningful journaling. Unfortunately that means my children do not have albums completed. Gasp, the thought of being so far behind. I confess all of this to you so you don't feel bad about how far behind you are. LOL

I used several cartridges and my cricut throughout the album and will try my best to post where each cut comes from. The paper is from My Minds Eye. I fell in love with this line and it made the album go together really quickly and flow together nicely. I'll be posting the pages throught the next couple of weeks so stay tuned for more.
This is the title page. The star is a chipboard star from my stash as well as the sticker and round frame on it.

Cricut cuts from:

Journaling Tag
A Child's Year - Teddy Bear, Baby boy, Duck, Bubbles
Graphically Speaking - Brand Spankin New, Journaling Mat
Stork
Wild Card - Buttons
Create a Critter - Moon

Monday, August 23, 2010

CKC Tulsa and catch up

I've had a very busy month! I'm sure most of you are in the same boat. It's that time again to get all the kiddies off to school and get into a routine again. I was fortunate to work at the CK convention in Tulsa this last weekend. I helped set up classrooms and then helped in one of the booths. More on that later. In exchange for setting up the classrooms I was able to get some great items. I picked up the Paper Crafts Gourmet which is an awesome book of recipes along with projects to package them up for gifts. Super Yummy!! The other book I got was Paper Crafts A Card a Day. Wow is it full of great ideas! I can't wait to get started on both of these books. I also picked up a couple of new scrapbooking tshirts. Too Cute!! Since I was working in a booth I was able to give my free passes to my BFF to enjoy.

Now for the booth I was helping in. It was The Treasure Box which is a monthly kit Club. You can find their website here.  I have to tell you the pictures on the website does not do them justice. Jill is an incredible designer. Each page is so detailed with little touches that are so unique. This club is so different from any other club out there. First you get to view two or more themes each month and choose the one you want to receive. The kits are for 6 full page layouts and all the work is done for you. The die cuts are cut, the printing is done, all your embellishments, ribbon, etc are included and you get a full color photo with step by step instructions. The cost is only $20.99 with free shipping and handling. There is no time commitment so you can stay as long as you like. Can you tell I gave the speech a few times? LOL I really was impressed with the quality and designs of the layouts and you can not beat the price. I would love for you to check them out and if you do join tell them Tina from CK Tulsa sent you. They have no idea I'm writing about them on my blog but I think it would be a hoot to bombard them with customers. I really appreciate the chance to help them out this last weekend and had a blast doing it!! I just wished I had a photo to show some of the unique detail she includes on the layouts. You'd be blown away!!

I also had another great Sunday at Michaels demoing the cricut and the gypsy. I had some fabulous customers come my way, many that already own the cricut but were curious about the gypsy or just wanted to share their excitement for the cricut. I truly love this job and hope it lasts for a looooong time. LOL

Hope you all had a blessed weekend!
tina


Tuesday, August 10, 2010

Demoing the Cricut Expression & Gypsy

I had a fabulous day demoing the expression and Gypsy at Michaels on Sunday. I met lots of amazing people from complete novices to some that owned a cricut themselves but were curious to learn more about these fabulous machines. Here are a couple of photos from the event.

If you're near Tulsa I'd love for you to drop in and say hi! I'll be at the Olympia Michaels Aug 15 & 22 from 1-5. All the Provo Craft machines are on sale this week including the V1, Create, Expression, Gypsy, and the Jukebox. And best of all if you buy from Michaels this month an Expression or Yudu they will donate one to the school of your choice! You can't beat that. I'm hoping they stay on sale all month!!

Saturday, July 24, 2010

Snow White Tilda and the cricut

This layout was so much fun and I love the way it turned out. I used a couple of different carts on it and even a Magnolia stamp, Tilda with apple.


Tilda with apple is colored with my copics and I even inked her a little bit around the edges with my cat eye inks. I just love the way she turned out!

The apple journaling spot is cut from Happily Ever After at 4". I inked it up with my cat eye inks.
The apple basket is also cut from HEA. I used ink and stickles to finish it off. 

The corner embellishments are cut from Storybook and then I glittered them as well. Using all the glitter tied it in so well to the designs on the paper. It just made it all come together so well.


And a final look at each page. Be sure to click on the pictures to see them up close. I just love all the glitter on the page.
The picture of Dopey waving by at the end is my favorite part of the whole ride!!

Have a blessed day and I hope you enjoyed the layout today!
Tina

Thursday, July 22, 2010

Wings of Friendship

This stamp set was a hostess set I got last year called Wings of Friendship from SU. I used my SU markers to color the stamp and then stamped it on white cardstock. All the other cardstock is from my stash. I cut the circles with my cricut and the Graphically Speaking Cartridge. There are circle cuts on lots of cartridges though. It's so great to be able to do graduated sizes of circles and scalloped circles. Now that I'm thinking about it I wished I'd done the blue circle a scalloped circle. Oh well I can make a few more. LOL

I used a sketch from the Card Scraps Blog Challenge for this month.  You should check it out and enter. Be sure to browse around the blog. There are lots of great projects to see!

I hope you enjoy and have a blessed day!
Tina

Wednesday, July 21, 2010

The Lion King


I took my son to see the Lion King for graduation and finally got the pictures scrapped. There's not a lot of pictures to scrap because photography is not allowed but we did snap a photo of the theatre before it started and of us together in our seats. We went to dinner before hand and I couldn't help having a little fun when I noticed the light above his head made a perfect halo. LOL He is my lil angel from heaven!! The theatre crash test dummy mask was just too funny. We had to get a pic of it too. We had a fabulous time and I can't wait to go to an actual Broadway play in New York but this was a night I will never forget!

I used  a free dingbat font from the internet to cut all the images and the title. The sun doesn't really show up in the pic as well as real life. I thought it was a great touch.

Thanks for taking the time to visit my blog. I love to hear your comments
tina

Tuesday, July 20, 2010

Organizing Shelf for my Inks

First I have to apologize for neglecting my blog lately. I really thought I would have tons of time this summer with both kids working but they still seem to rule most of my days. LOL I wouldn't have it any other way though. I love my kiddos and miss them terribly. My sister also found out she has advanced stages of colon cancer. She's in the hospital and my mom has been staying with her. I really worry about my mom because she's diabetic and just had several surgeries to open blockage to her heart. They're an hour away but I try to take dinner to my mom and make sure she's taking care of herself. Well enough about me let's get on to the project for today!
I saw this shelf made out of foam board a while back and thought it was the coolest thing. Well I finally picked up some foam board and tried it. I love it! It works fabulous for all my inks including my copic markers. It is a lil shallow for the markers so I'm going to make a modified version to sit along side it for all my markers. Ok, I don't have all that many now but give me time. LOL

I have my SU pads on the far right and then my Memento and finally my Distress inks. The first I put slanted shelves in to hold my Copics and I have my versamark in the bottom right corner. My cat eye inks are on top along with some stickles and other tools I use often. This whole project cost me $2, can you believe it?! My husband was really skeptical at first because of it being foam board but it really is quite sturdy and plenty durable for inks. Now that he's seen it all set up he thinks I'm a genius for doing it for $2. LOL

The website that I got the pattern from is http://RebelInker.blogspot.com
She has done a lot of work and put an entire pattern together for it. Be sure to thank her if you download and use her pattern. She rocks!!

And if you try it be sure to let me know. I would love to see it!

Hugz
Tina

Monday, June 28, 2010

Happy Birthday Sweet Treat

This is a quick card I put together using From my Kitchen and my cricut. The paper is from DCWV and of course lots of stickle and ink. I used paper glaze on the cherry to give it a shiny look as well. I love all the bling!

I hope you enjoy!
Hugz
Tina

Saturday, June 19, 2010

Happy Father's Day Captain Edwin


Here's a quick card I put together for my hubby for Father's Day. I just received Capt Edwin and couldn't wait to use him. I also colored and used Tilda with Jolly Roger on the inside of the card. Magnolia Stamp Lovers
is having a challenge for Father's Day so I entered it there.

The striped paper is from Basic Gray. The treasure map and treasure chest is cut from Paper Doll Dress UPs. I colored everything with my copics and distressed with my cat eye inks.
SimonSays is having a pirate challenge so I entered there as well.

Cupcake Easle Card made with the cricut and Tilda

I finally got a quick video put together for the cupcake easle card I did a couple of weeks back. I hope if you haven't tried one that you will and let me know. They are really easy and such a WOW card to give someone. You can check out all the details for the card below on my blog HERE 


Tuesday, June 15, 2010

Q & A Where can I buy those gorgeous flowers and other embellishments?

It's time for another Q&A

The next question I get asked a lot is where can you find all those gorgeous flowers and other embellishments you see on the Magnolia cards. There are several places you can buy these but I also challenge you to look everywhere around you because you can find all kinds of embellishments and a lot of times it's much cheaper. Go ahead think outside the box, a little glitter and bling to an item can really jazz something dull into something fabulous!
Prima flowers
Susanascustomartandcarddesign has all kinds of prima flowers, petaloo flowers, pins, bling, etc
StampingScrapping has magnolia and prima flowers and well as some bling
Wild Orchard Crafts has everything Magnolia such as flowers, lace, pins, chandeliers, etc. They are in the UK but I have found shipping is very reasonable. A question I get with these are what size to order. I found this information so hopefully it will help. "I went with an array of sizes from 8mm to 25mm. 25mm are the perfect size. It measures about the size of a nickle. The 10mm are a great petite size as well as the 15mm. They are perfect to layer on other flowers" 
Simon Says Stamps has flowers, charms, and other embellishments
Martha Stewart punches are great for leaves, flowers, borders, etc


I hope this will get you started if you've been looking to purchase some flowers and if you have others please post or email me and I'll update this post with the information. Also don't forget about making your own. There are several tutorials out on youtube and the net in general to show  you how to make your own.


Have a blessed day
Tina

Friday, June 4, 2010

Happy Birthday Tilda with letter

Here's is the adorable Tilda with letter. I colored her with my copic markers and decided to try my hand at making a tri-fold card.

I really love how it turned out and how the card slides out of the envelope.
DP - Basic Gray Lemonade collection.
Happy Birthday stamp - Studio G $1 stamp
Circle Birthday stamp - Just Rite Stamps
Scalloped Circle - Mini Monogram cart & cricut
Martha Stewart border punch

Thanks for stopping by and I appreciate all the wonderful comments you take the time to leave.
Hugz
Tina

Thursday, June 3, 2010

Whiff of Joy Willow with basket

This is an adorable image that was given to me in the last image swap. She is Willow with basket from Whiff of Joy stamps. This is a new line of stamps to me but I'm sure I will be ordering some now. I have a teenage daughter and these are just perfect for her. I colored her with my copics and then cut her using a nestability file and MTC with my cricut.
The paper is Basic Gray again. I really love this line. It's so soft and girly.

I'm entering this in the Friday sketchers Challenge.

Have a blessed day!
Tina

Thursday, May 27, 2010

Happy Birthday Cupcake Tilda

Hello everyone! I've been wanting to make a shaped easle card and finally got one done thanks to Magnolia Down Under's challenge. I designed it on my Gypsy and the Doodlecharm cart.

The icing is embossed with my cuttlebug and the Dvine Swirl folder. I wanted to recreate the pleated look of a cupcake bottom so I used the distressed stripe folder for it. I think it turned out fabulous. Of course you have to have some bling so I used stickles on all the swirls.
I colored Dinner Tilda with my copics and sat her on a piece of twill ribbon from Lil Davis Designs.
The Happy Birthday is a Studio G wood rubber stamp from the $1 Michaels bin. All the swirls were a perfect match for the swirls on the cupcake to tie it altogether.

I hope you enjoy my card and leave me a comment. I'm entering this in the Magnolia Down Under Challenge - make a shaped card. Sun May 30
Lil Red Wagon - birthday theme
Sew Many Challenges - Anything Goes by Thursday June 3
Hugz
Tina